
Using tags is the best way to make your report more insightful, as they help classify buzz and provide detailed information.
Tags can be applied in different types of social media analysis, for example:
- Brand perception analysis: Brand pillars can be turned into tags to help you understand if the brand attributes are truly being perceived.
- Product features analysis: Use tags when analyzing a vehicle brand and need to create labels for each feature or functionality of the vehicle: power steering, ABS brakes, leather seats.
- Customer service analysis: You can also create a classification by tags to analyze the types of contacts you receive on your brand’s channels: product exchange request, product complaint, product information search, etc.
- Purchase decision process analysis: With tags, you can map out at which stage of the purchase decision process your consumer is in. Tags are very flexible, and Buzzmonitor can even be asked to automatically tag.
How to create tags?
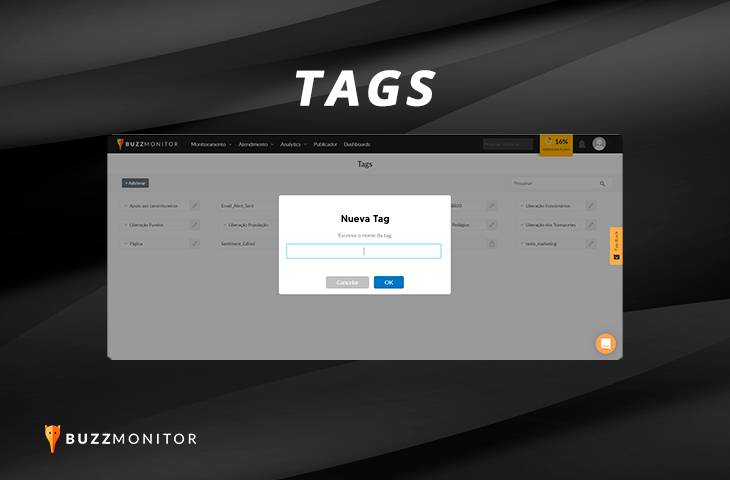
When opening your report, click on the tags icon and select the option “Create New Tag.” As soon as the new window opens, simply assign a name to the tag and click “Accept.” You can create as many tags as you want.
To add a tag to multiple interactions, select the box on the left side of each desired interaction or in the multi-function box, you can select all. Then, in the multi-function box, select the tags icon and add a new tag.
Subtags
With subtags or sub-labels, it’s possible to classify your brand’s interactions, which is important to understand the topics of mentions made by your customers. In a clothing brand, for example, it’s possible to create subtags with the names of the products and know which ones are the most mentioned.
Example:
Tag: Zara
Subtag: pants, dress, accessory, coat.
When opening the report, click on the tags icon and select the option to create a new tag, you must name it starting with the name of the main tag. Example: if the main tag is “complaints,” to create the subtag you must write “product_complaints.” Ready! The secondary tag “product complaints” will be created!
Then you can group all the tags in the same group. Grouping tags and subtags helps to have a cleaner view of your reports. To group them, simply select the tags icon, select the ones you want to group, and select the “Group Tags” option; you can also ungroup them.
Note: The tagging process can be done automatically through Triggers in Buzzmonitor.
Creating a report with tags
The first step is to create a new report so as not to touch any other report in your monitoring or customer service folder. To create this new report, simply open your folder in Buzzmonitor and click on the top right corner of the screen on “Create New Report.”
When clicking on create new report, the report configuration screen will appear. In the Filters tab, you must mark the following configuration:
In the tags/labels field: only by tags In the sidebar field: click on “view all tags” and select the ones you want and press “ok.”
In the Charts tab, we will mark the following configuration:
Group by: Tag/Label Tags to display: select the tag you want + subtag Division: no division
Important: The tags or labels selected in the chart must be the same as those selected in the filters.
Ready! Now you know how to use tags in Buzzmonitor.
